This lighting setup is designed specifically for makeup artists and hair vendors who want their work to look professional on camera. While lighting for hair and makeup is slightly different, the core principles are very similar.
In this guide, I demonstrate a setup that works for both hair and makeup, using one model so you can clearly see how the lighting enhances skin, makeup details, and hair texture at the same time.
Essential Equipment Overview
Before we begin, here’s what I’m working with:
- A tripod with a phone mounted in front
- A key light (primary light source)
- Optional side lights
- A backlight
- A reflector (or alternative light source)
- A backdrop (optional)
I’ll show you which lights are mandatory and which ones are optional, and how to progress from beginner to pro-level lighting.
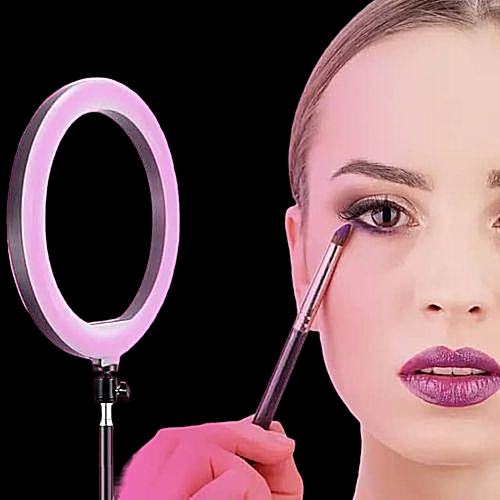
The Best Key Light Setup (Mandatory)
The key light is the most important light in this setup and cannot be compromised.
Recommended Key Lights:
- 18 inch ring light (great and affordable)
- SU Photo BY-100 RGB
- LED 660 Pro
The key light should be placed in front of the model, raised slightly above eye level, and tilted downward.
This angle mimics natural light and helps:
- Reduce harsh shadows
- Define facial structure
- Enhance makeup and hair shine
Lighting is not just about brightness, positioning is everything.
Using Side Lights (Optional but Powerful)
Next are the side lights, placed on both sides of the model, angled slightly toward the back and spilling light toward the front.
Important notes:
- They should not point directly at the cheeks.
- They don’t need to be very bright.
- Any light source can work, even small or portable lights.
Side lights:
- Add depth
- Enhance hair texture
- Create a more cinematic look
These lights are optional, but they significantly elevate your content.
Background and Color Considerations
Your background plays a major role in how much light you need.
- A high-contrast background (dark outfit on light background or vice versa) requires less lighting
- Bright outfits on bright backgrounds require more light
In this setup, I’m using a white PVC backdrop, which reflects light and usually requires additional lighting to avoid a flat look.
The Backlight (Optional but Recommended)
A backlight helps separate the model from the background.
- Place it behind the model
- Aim it toward the background, not directly at the subject
- Maintain some distance between the model, the light, and the backdrop
This light:
- Adds depth
- Prevents the subject from blending into the background
- Creates a more professional finish
Any bright LED light can work for this purpose.
Why a Reflector Is Important (Especially for Makeup Artists)
A reflector is crucial for makeup videos because it:
- Brightens the under-chin area
- Reduces shadows under the nose and jawline
- Creates balanced facial lighting
If you don’t have a reflector:
- Use a small ring light
- Use a portable light
- Place the light on the model’s lap or just below the chin
Hair vendors may skip this, but for makeup artists, it’s highly recommended.
Room Lighting: What You Should Do
For best results:
- Turn off room lights
- Work in a darker space so your video lights control the scene
Ambient lighting won’t ruin your video, but reducing it improves contrast and quality.
Phone Camera Settings (Simple & Effective)
You don’t need special camera settings, lighting does the heavy lifting.
Recommended steps:
- Use video mode
- Turn on grid lines in your camera settings
- Slightly zoom in (around 1.5x–1.8x) instead of using wide angle
- Frame the model’s head in the center grid box
This creates better composition and avoids distortion.
Lighting Levels Explained
Beginner Level
- 1 key light
- Reflector (or small light under the chin)
This setup alone is good enough for clean, professional content.
Intermediate Level
- Key light
- Reflector
- Backlight
Use warm light tones for both makeup and hair. Warm lighting enhances skin glow and looks more flattering than pure white light.
Pro Level
- Key light
- Reflector
- Backlight
- Side lights
Side lights should be subtle and warm. When combined with the reflector, they:
- Highlight hair texture
- Enhance makeup details
- Add depth and dimension
This is your maximum-level setup.
Using Portable Lights
If you’re on a budget:
- Clip lights
- Small portable LEDs
- Affordable mini lights
These can function as:
- Side lights
- Backlights
- Chin lights
However, never compromise on your key light. That is the foundation of everything.
Final Thoughts
You do not need every light to create great content.
This guide shows:
- What each light does
- Why positioning matters
- How to scale your setup based on your budget
There are thousands of ways to light makeup and hair videos, this is just one proven method that works.